There are loads of great day trips from La Paz, but one of the most popular is biking down Death Road. It sounds scary, and to an extent it can be, but it’s a thrilling day. You’ll take a rental bike over thirty miles down a mountain, passing great scenery and getting your fill of adrenaline.
I’ll fully admit that I was nervous when I signed up for the tour, but it ended up being one of my favorite days in La Paz. Here’s everything you need to know about cycling Death Road.
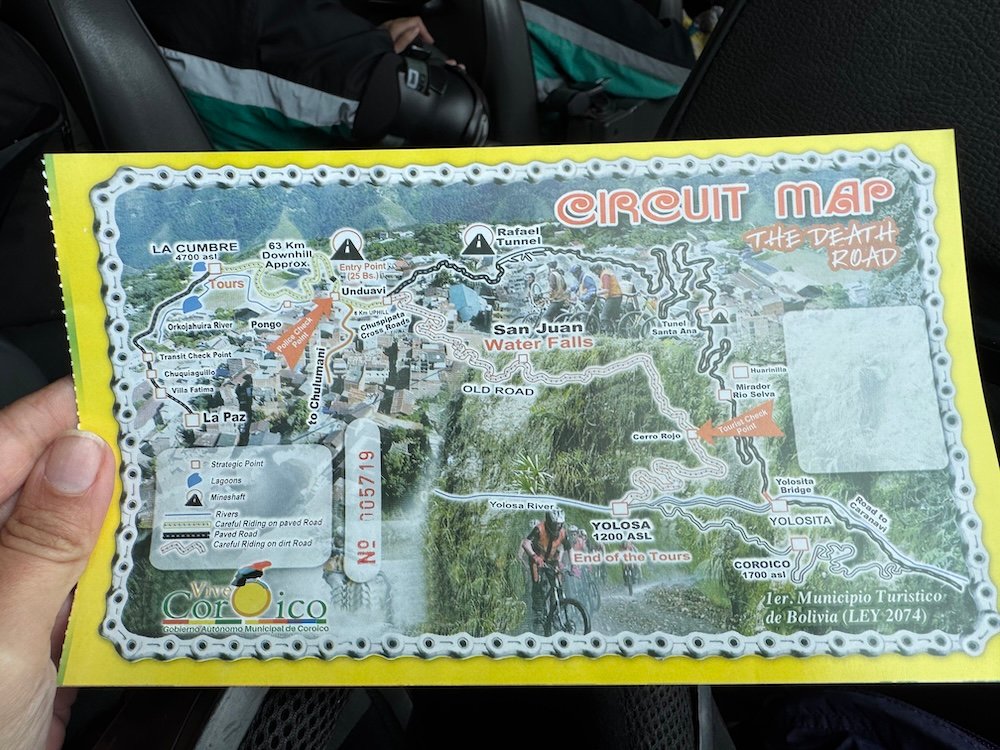
What is Death Road?
Unsurprisingly, Death Road gets its name because of the amount of deaths that occurred on it. Back when it first opened, it was the only road connecting Unduavi and Yolosa. Now, a new, safer road has been opened and the original Death Road is mostly used by tourists getting their adrenaline fix.
That said, when Death Road tours were originally offered, the new road didn’t exist. That meant that bikers were sharing the road with two way traffic. Yes, bikes and cars shared a narrow, unpaved, bumpy road that had no guard rails and drops of up to 200 meters. As our guide told us about this history, several of us said “if that was still the case, I wouldn’t be taking this tour”.
So while it is a little safer because you don’t have to worry about the two way traffic, Death Road is still dangerous. I took my tour in April 2026 and our guide told us that as recently as August 2025, a tourist died after losing her balance and falling off the cliff. And it’s not just death that you need to be concerned about. Our guide’s phone was filled with videos he took of people crashing while on Death Road.
Biking Death Road can be dangerous, but I think if you’re smart about it, it can be a fun experience.
Choosing a Tour Company
Your tour company for Death Road can mean the difference between a fun, adrenaline filled day or a day filled with injury (or worse). While it’s easy to just pick the first option that comes up, I think research is key.
I read reviews from several companies before finally deciding to book with Barracuda Biking. They were a more budget option for Death Road, but all of the reviews I read emphasized safety. This was incredibly important to me and I felt that commitment to safety while on the tour.
Our guide, Chelo, gave us a safety briefing before we started for the day. Then after every break, he reminded us of the most important safety protocols. There was no doubt that his top concern was getting all of his tourists off the mountain safely at the end of the day.
Another thing to look out for is the bikes. Every company has their own bikes. Some companies will give you options for your bike, but Barracuda Biking didn’t. That said, their bikes were in good condition and we managed to ride the entire day without a flat tire. Chelo said they normally get four to six flat tires per day. We definitely got lucky, but I want to stress that the number of flat tires isn’t necessarily a bad thing. Reviews for all companies mention flat tires and once you see the road, it’s easy to see why they are so common.
As mentioned, Barracuda Biking was a budget option, though it still wasn’t a cheap day by Bolivian standards. I paid $85 USD for the day, but that’s still budget for this activity. Gravity and Altitude also get good reviews (though I wasn’t very impressed by what I saw on the road with Gravity) but are more expensive. And of course, there are many other operators in La Paz offering Death Road tours.
That all said, if I were to do it again, I would go with Barracuda Biking.
What to Expect on a Death Road Tour
Ok, you’ve read about Death Road and you’ve chosen your tour company. Here’s what to expect on your Death Road adventure.
Note that this is based on my experience. While most companies will follow something similar, there may be slight variations.
Meet Up, Breakfast, and Transportation
Our day started at 7:00 in the morning where we met the group at a restaurant for breakfast. My day started even earlier since my hostel was outside of the main city center and I had a 20 minute walk to the meeting point.
At breakfast, I noticed that there were a lot of people, which seemed suspicious since I thought I had read that groups are capped at 14. In my case, we got split up into two groups: one of 12 and one of 13. In a twist of fate, one guide seemed more energetic than the other and I was disappointed that I wasn’t assigned to him. It worked out though because my guide was great and we actually finished over an hour earlier than the other group (and I never felt like we were rushing).
Breakfast was basic. There was coffee and tea, but then everyone got a sandwich with avocado, tomato, and cheese. We signed our waivers and loaded into the vans to take us to the start of Death Road.
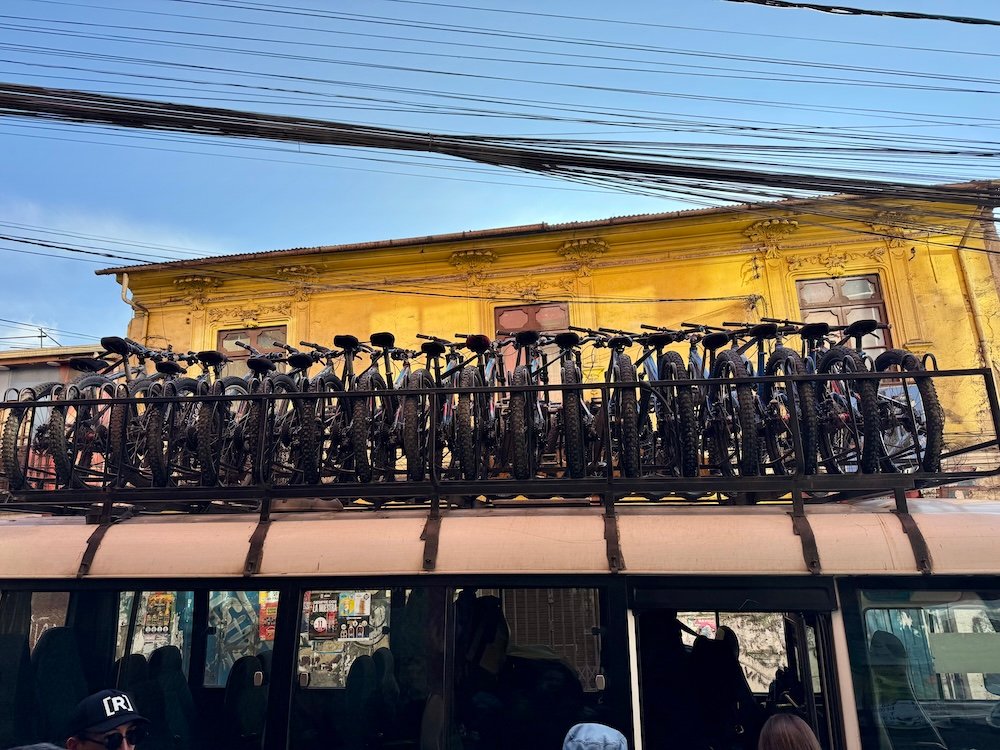
From the center of La Paz, it’s about an hour to the start of Death Road (depending on traffic). Along the way, our guide passed out helmets and gloves. We had submitted our sizes when we signed up for the tour, but they had a few extras so everyone was able to get something that fit them correctly, which is incredibly important for Death Road.
Safety Briefing
We arrived at the start point and were given pants and jackets. While the helmets and gloves could be swapped out to make sure you got the right size, the pants and jackets aren’t perfect. Our guide fully acknowledged that the jackets and pants were going to be close, but if it didn’t fit perfectly, it was fine. It was much more important to have a proper fitting helmet and gloves.
Then we were given our bikes. Like with the clothing sizing, we also submitted our height and weight to the company and they provided bikes for each person based on that information. A paper was passed around the bus so you could see the name of your bike (mine was Monolitho). Once they unloaded all of the bikes from the roof of the van, you had to find your bike and try it out. A few of us had to adjust our seats, but everyone’s bike seemed to fit them well, which is good.
The guides will tell you to ride in the parking area to feel out your bike. While you do this, the guides watch you to make sure that you look steady enough on the bike. Based on what they see, they may require you to wear knee and elbow pads. The pads are available to anyone who wants them, but only those who seem unsteady are forced to wear them (no one in my group was forced).
Before the ride really starts, you’ll get a safety briefing. The guide will talk about the route and make sure everyone is aware of proper braking (use your rear brake first). This talk was given both in English and in Spanish to make sure that everyone understood.
Our guide also stressed the importance of spacing. He told us repeatedly throughout the day that we should be riding single file with two to three bike lengths between the person in front of us. Of course you can pass if you need to, but we wanted to make sure to keep the distance between the bike in front of us. This helps to make sure that we don’t have a chain reaction crash.
I don’t think every group gets the same speech about keeping distance. The group at Gravity would often pass us in big groups (scaring a bunch of my group in the process). It got to the point where our guide would point to the Gravity group and tell us “don’t be like them.”
Before we knew it, we were off.
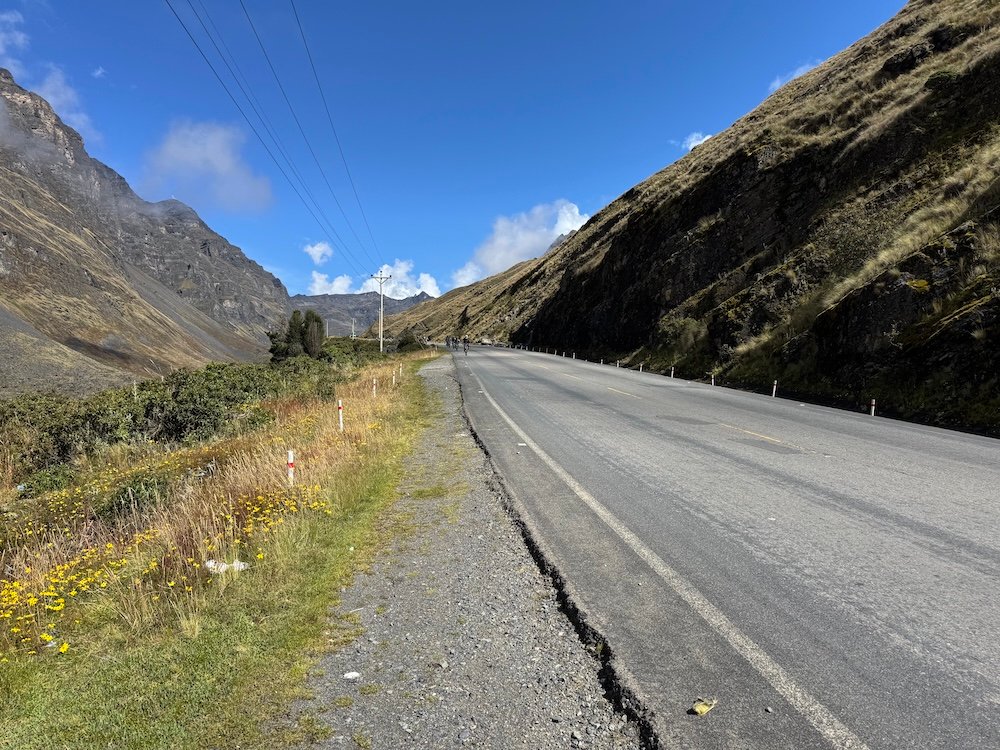
The First 12 Miles
The first twelve miles is the most fun in my opinion as you’re biking on pavement. You pick up speed and it’s just a matter of steering and not crashing your bike. Over these twelve miles, you’ll descend over 4,000 feet so it’s a fun journey.
With my group, we biked for just five minutes and then stopped. This would be a common trend throughout the day where we would bike a bit, stop, and regroup. The benefit of this is that no one got too far ahead or too far behind on the day. It also meant that everyone could go at whatever pace they felt comfortable, though in general, I would say my group was typically right in the middle. We didn’t have anyone racing down the mountain as fast as they could, nor did we have anyone riding the brakes the entire time (though one hand was almost always on the brakes to prevent yourself from going too fast).
Our first break was after five minutes. Our guides (we had two riding with us), wanted to make sure that everyone felt comfortable and had no issues with their bikes before we continued. Once we assured him we were fine, we got back on the bikes and kept riding.
As mentioned, this first section is pavement and you will share the road with cars. It wasn’t terribly busy in the morning, but there were still a few cars passing us.
We stopped twice more along this pavement section. Once about halfway through and once right before a tunnel. We didn’t take the bikes through the tunnel and instead biked along a rocky patch of road. This was our introduction to what biking Death Road was like. I immediately missed the pavement.
This first section took us about an hour, including all of our stops. Since it was (mostly) smooth pavement and entirely downhill (I think the only time I pedaled was the five seconds when we got started), we made great time. My watch logged an average speed of 18 miles per hour, though apparently at one point, I hit 29 miles per hour during this section.
Back to the Van
After our brief rocky section, we got off the bikes and they were loaded on the top of the van. While most of Death Road is downhill, there’s a little bit of uphill. Rather than biking uphill for eight kilometers, the guides load the bikes back onto the van and drive us up the mountain. There, the bikes are unloaded again and we start biking downhill.
On the drive, we were given some snacks. We hadn’t done much to justify the snacks, in my opinion, but this is where it makes the most sense to eat. We had a sandwich, banana, and a chocolate bar. Water bottles were also passed out.
Fortunately or unfortunately, it started to rain. We had beautiful weather on that first section of road, but then we got rain and fog. The bad news is it was raining and we couldn’t see the surrounding scenery. However, our guide told us that the rain was good because it made it easier for the bikes to grip the road (I’ll take his word on that). As far as the fog, at least we weren’t distracted by scenery since this next section required you to really pay attention to where you were riding. And at the very least, at least we didn’t have snow (like our guide had the week before).
But eventually we had to go out into the rain and start our ride.
It’s worth noting that in the first section, the van followed all the way at the back of our group. On this next section, we didn’t have that luxury for a fallback. A landslide made it nearly impossible for vehicles to get through the entire road, so it’s just bikes now (at least until the end of the road). Our driver took the new road and met us at the end. So now, there was no choice but to cycle all the way to the end.
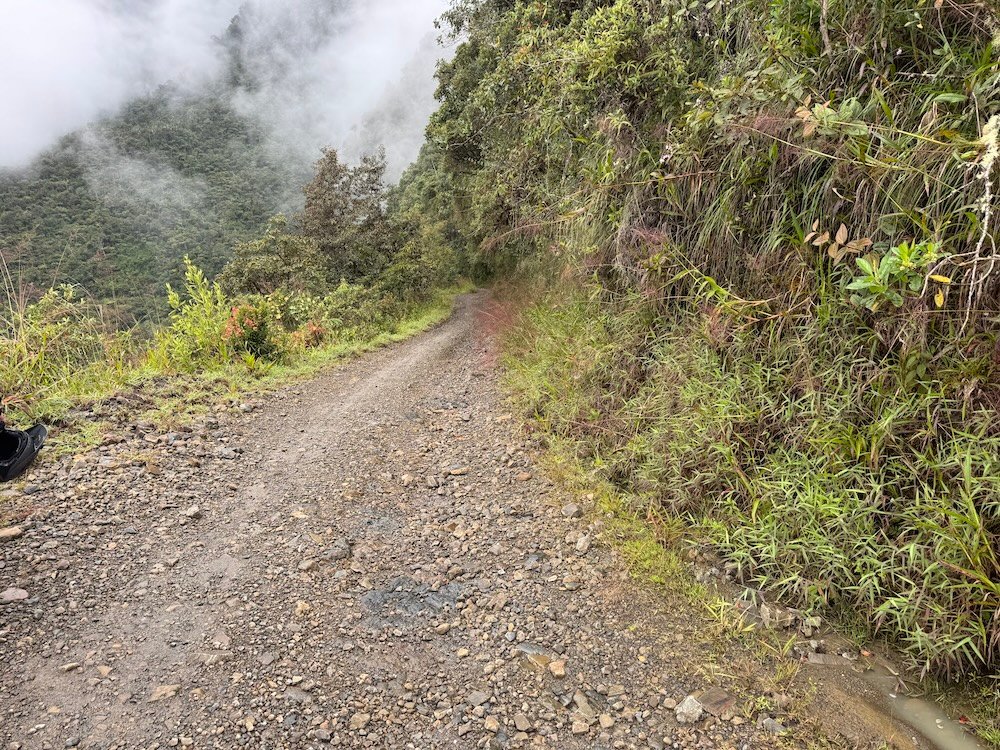
The Next 20 Miles
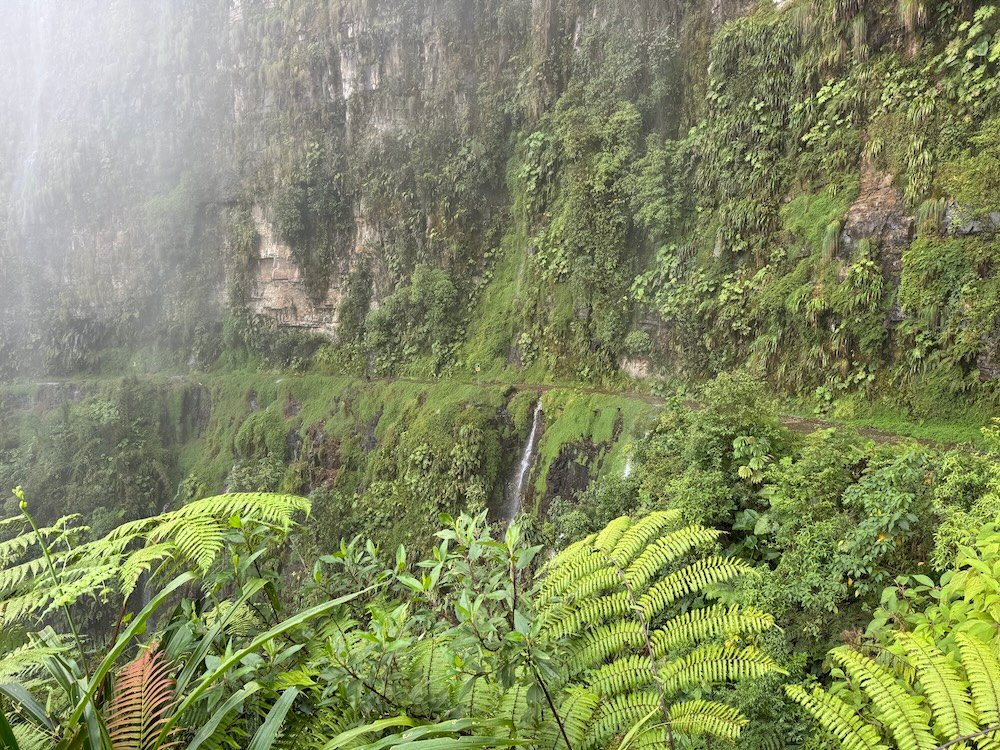
It’s mostly downhill all the way to the end, but the road is now rocky and uneven and you have to watch where you’re going. You can still pick up speed, but not the kind we did before. We rode around curves, through waterfalls, and down the mountain. It was fun, but also scary in a few sections.
Along the next 20 miles, we’d drop another 6,200 feet in elevation, so it’s definitely still downhill. That said, my speeds were slower, with an average speed of just 10 miles per hour, according to my watch. I maxed out at 22 miles per hour, which is still pretty fast.
We stopped occasionally to regroup and take photos, but in general, it was one long descent down the mountain that took us a little over three hours. We biked for about two hours (including stops), and then had an extended 45 minute break. Here we were able to ditch the jackets and pants (though we still had our helmets and gloves) before the last 7 miles of biking.
On the last section, we had to be more aware of cars, but thankfully I think we only passed two vehicles along the way. Unfortunately there were some sections where we actually had to pedal. It’s not that pedaling is hard, but after 25 miles without having to pedal, it was a shock to the system.
Speaking of shocks to the system, the last kilometer is uphill. We all started out on bikes but ditched them pretty early on and walked the bikes to the finish line.
But we all made it. No flat tires. No crashes (though there were a few falls when we got started). No injuries. All in all, I’d call it a very successful trip.
Relaxation, Lunch, and Celebration
We finished at a small hotel that Barracuda Biking has a partnership with. Here, we got a chance to change out of our wet clothes (I can’t stress how good it felt to get out of wet shoes and socks) and go for a swim. We also ate a buffet lunch and relaxed before the journey back to La Paz.
Back to La Paz
It should have been a chill ride back to La Paz. For most groups, I assume it is. However, our luck of no flat tires for the day finally ran out and our van got a flat tire. So, we had to sit at a mechanic shop for 45 minutes while that got fixed. In the meantime, our guide passed out lollipops and entertained us with videos of people crashing on Death Road. At least he waited until after we were done biking before showing us all of these videos.
We finally arrived in La Paz just before 9:00 pm, though I talked to someone else who did the tour a different day and he told me that his group didn’t get back until 10:00 pm. Essentially you need to be prepared for a very long day.
Should You Do a Death Road Tour?
Ultimately it’s your decision but I think the biggest thing to note is that you should only do a tour on Death Road if you are comfortable on a bike. It’s a bumpy, uneven road and you need to feel comfortable enough maneuvering.
I didn’t have any experience mountain biking, but I feel very comfortable just riding a bike. I felt fine the entire day, but can definitely recognize that it would be terrifying if you feel uneasy on a bike.
What to Bring on a Death Road Tour
When I booked my tour, I got a message on WhatsApp with a list of things I needed to bring on my tour. Some things are obvious, but others aren’t.
A change of clothes – You will get wet and I cannot stress how good it feels to put on dry clothes after the tour.
A change of shoes – I’m including this as a separate item because it’s something you probably won’t be thinking about. My shoes were soaked after the Death Road tour (taking two days to fully dry out in my cold hostel room), but thankfully I had dry shoes (and socks) to change into.
Swimsuit – This may vary on the tour, but for my tour, we had the opportunity to swim after the tour while we waited for lunch to be ready. Towels were provided by the company.
Bug spray – You won’t need it when you start the day since you’ll be at 15,000 feet above sea level, but at the end of Death Road, you’ll be at 4,000 feet and will likely see mosquitos again. Be prepared.
Sunscreen – This should go without saying, but make sure to bring and apply sunscreen.
Cash – There are a few opportunities for bathrooms throughout the day, but several of them are paid toilets. Make sure you have a few coins.
When I took my tour, Barracuda Biking provided pants, jackets, gloves, helmets, and the actual bikes. They also provided bottled water and snacks along the way.
More in La Paz
La Paz is one of the capital cities of Bolivia (Sucre is the other) and there’s some interesting things to do in the city. Wander the city center (I recommend a walking tour to get the most out of your experience) or see a cholita wrestling show.
Outside of the city, there’s no shortage of day trips. Moon Valley in the southern part of the city offers unique and incredible views. For those interested in mountains, Chacaltaya is a popular day trip and Charquini allows you to visit a beautiful lake. For more adventure, consider hiking Huyana Potosi, a mountain with a peak above 6000 meters.
Final Thoughts
I’ll admit that I was a bit nervous when I signed up for my Death Road Tour, but I felt like it was one of those things that I had to do when I was in La Paz. I’m so glad I did it. It was a very long day, but I had a blast and would recommend to most travelers.
Continue Your Adventure
Bolivia: In the capital city of La Paz, there’s no shortage of day trips including hiking at Chacaltaya Mountain, Charquini Lagoon, and Moon Valley. Near Sucre, you can hike at the Maragua Crater. Halfway between Uyuni and Sucre is Potosí, which was once one of the richest cities in the world. In the very north, along Lake Titicaca, you’ll find the beautiful Isla del Sol. And lastly, no trip to Bolivia would be complete without visiting the Uyuni Salt Flats. Learn even more in my Bolivia Travel Guide.