
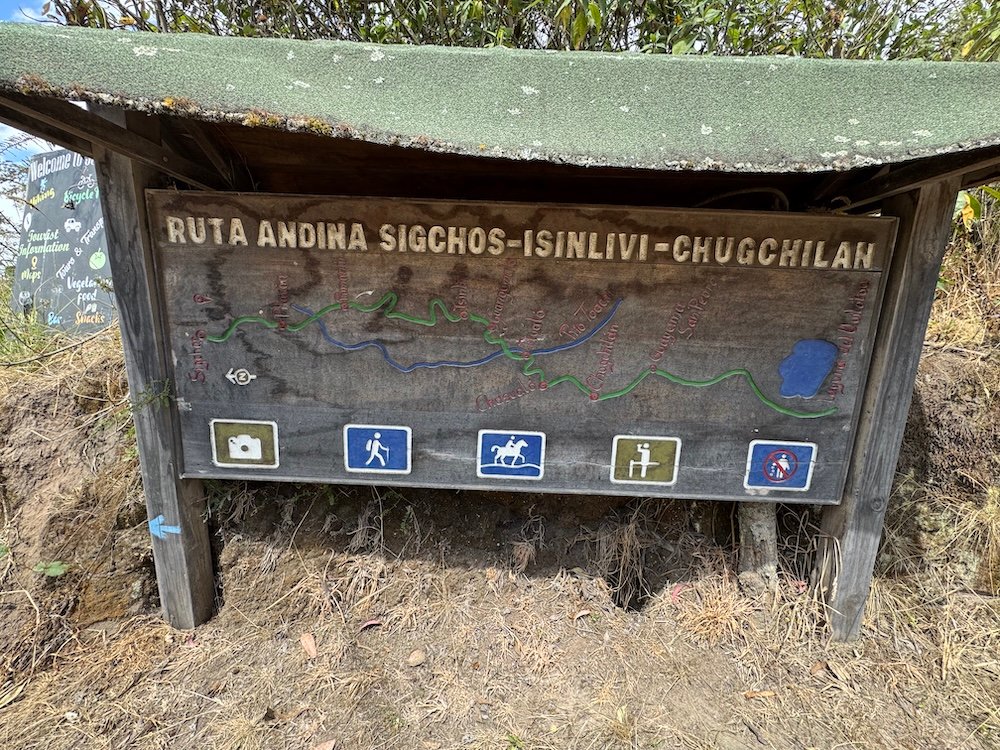
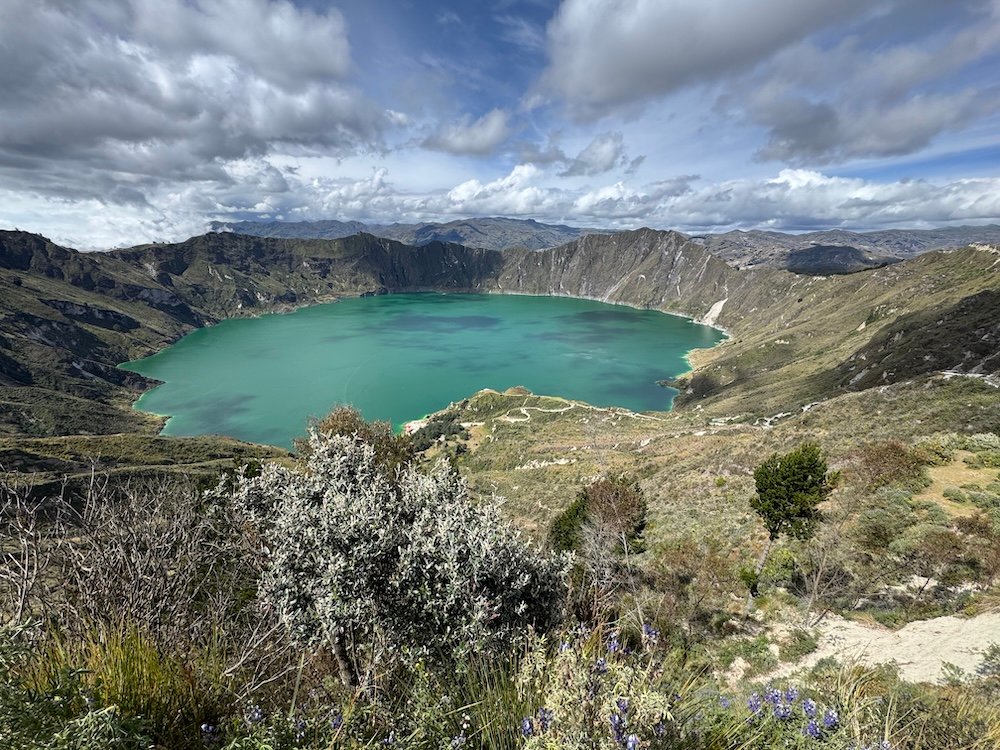
Located in Ecuador, the Quilotoa Loop is a popular hiking trail for tourists. While the exact route can vary slightly, most visitors start in Sigchos and spend three days hiking through the valleys and mountains to reach the Quilotoa Lagoon.
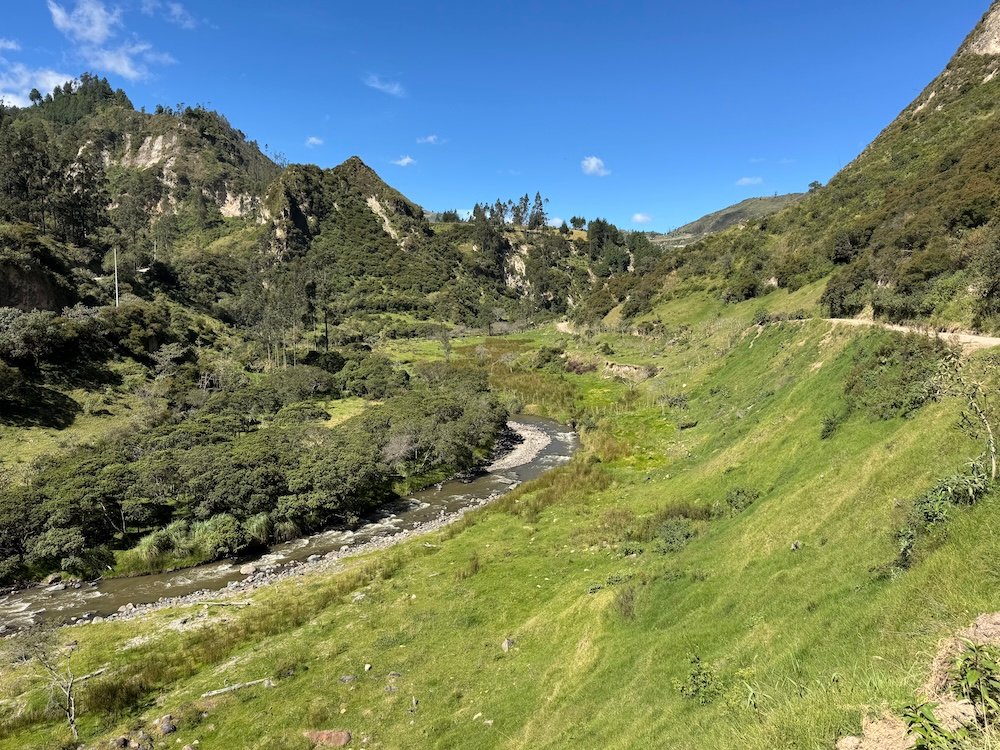
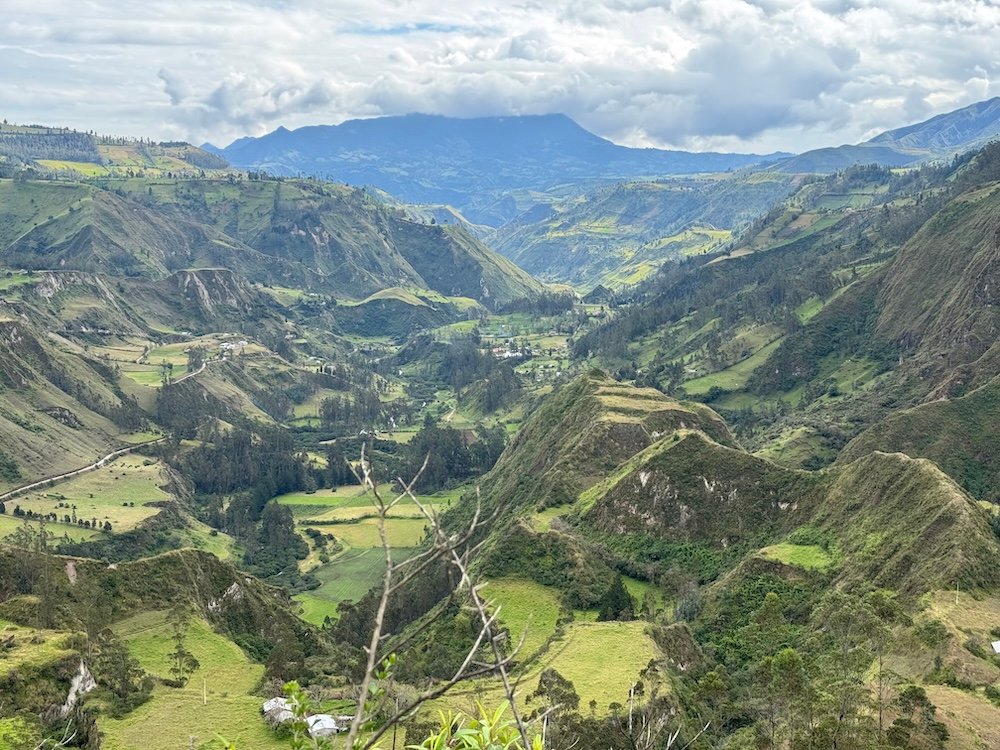
The Quilotoa Loop is not the most difficult multi day trek I’ve done in South America, I wouldn’t call it easy. But your reward for those three days of hiking is coming over the ridge of the crater and getting that first glimpse of the Quilotoa Lagoon. Plus, you’re passing through small towns with great mountain views for a few days. And it’s unguided, so you can go at your own pace.
Here’s everything that you need to know about planning your own trip on the Quilotoa Loop.
Popular Routes Along the Quilotoa Loop
The most popular route involves hiking from Sigchos to Quilotoa over three days. Here’s what that looks like:
Day 1 – Hike from Sigchos to Isinlivi
Day 2 – Hike from Isinlivi to Chugchilan
Day 3 – Hike from Chugchilan to Quilotoa
However, these are not the only routes. You can start before Sigchos or keep hiking after Quilotoa. While you absolutely can do these additional hikes, they are significantly less popular and you’ll likely find yourself hiking alone.
At the same time, if you don’t feel like hiking three full days, you can shorten your hike. All of the towns in the region are connected by bus, so you can skip sections of trail as you see fit.
That all said, this guide is going to focus heavily on hiking from Sigchos to Quilotoa since that’s not only what I did, but also the most popular option.
Traditional versus Reverse
So you’ve decided you’re going to hike between Sigchos and Quilotoa. Which direction do you hike?
Most people will hike from Sigchos to Quilotoa, known as the traditional route. Each day, you’ll have a slight descent into the valley before a long hike up. You’ll gradually gain elevation over each day as you climb higher and higher into the mountains of Ecuador. The last day is the finale with the views of the Quilotoa Lagoon. That last day is also the hardest day so you’ll get two days of warm ups before the most difficult part of the trek.
The alternative is the reverse route, where you’ll start in Quilotoa and finish in Sigchos. You’ll still have a descent followed by an ascent everyday, but you’ll have an overall elevation loss every day. Your hike starts at the Quilotoa Lagoon, which in my opinion is the best scenery on the trail. Your first day will be the longest and hardest, so the days will gradually get easier.
So which route should you do? I’d suggest doing the traditional route. Yes, it’s what I did and it has more elevation gain, but I still think this is the best option. Your first two days are a warm up for a challenging day three. Plus, your hike will end with those incredible views of the Quilotoa Lagoon.
It is worth knowing that during my time on the Quilotoa Loop, I only passed one couple who were hiking the reverse route. Everyone else was hiking the traditional route and going from Sigchos to Quilotoa.
Getting to the Quilotoa Loop
All of the towns on the Quilotoa Loop are tiny, so you’ll likely need to make some kind of connection to get to Sigchos or Quilotoa.
Note that Isinlivi and Chugchilan are also served by buses. If you need to reach one of these towns by buses, I highly recommend reaching out to your accommodation as the bus schedules for these towns are infrequent (though buses do run daily).
To Latacunga
Latacunga is the traditional starting point for the Quilotoa Loop. You’ll pass through here on your start of the trail and when you end the trail. It’s from this town that you can catch buses to Sigchos, Isinlivi, Chugchilan, and Quilotoa.
Note that not every bus to Latacunga actually stops at the terminal. Many of the buses on larger cross country routes may only stop at the side of the highway. From here, you’ll want to take a $5 taxi into the city of Latacunga (or be prepared for a 1+ hour walk). The good news is that plenty of buses leave from the actual terminal, so once you’re in town, it’s unlikely you’ll need to go back to the highway to catch a bus (though check with your accommodation to be sure).
From Baños
I could not find a direct bus from Baños to Latacunga. I’m almost certain they exist, but trying to find actual bus schedules in Ecuador is not easy. So instead, I got a bus from Baños to Ambato and then transferred in Ambato to a bus to Latacunga. Buses from Baños to Ambato are incredibly frequent and you should be able to find one leaving within 15 minutes no matter when you arrive at the bus station.
I was told that buses from Ambato to Latacunga are frequent, but I don’t know the exact frequency. My journey was a bit chaotic as I transferred buses on a random side of the road, rather than an actual terminal. Let the bus driver/driver assistant know your destination is Latacunga. If they pass a bus going to Latacunga, they will have you transfer immediately to try to save you time.
From Quito
If you’re departing from Quito, find a bus heading south towards Baños or Ambato. Of course it’s best to find a bus that will go to the Latacunga terminal, but any bus heading in toward Baños or Ambato will be able to drop you at the highway to Latacunga. From there, it’s a short taxi ride to the city center.
To Trailheads
So you’ve reached Latacunga and now you need to get to (or from) the Quilotoa Loop. Here’s what that transportation looks like.
Connecting to Sigchos
Buses from Latacunga to Sigchos depart frequently. At the time of writing, the bus leaves the Latacunga terminal every hour bound for Sigchos.
Despite getting off the bus in Sigchos, I’m still not sure where exactly the main bus stop/terminal is. Buses in Ecuador will typically stop wherever you request, so when you arrive in Sigchos, get off when it looks like you’re close to your hotel (or the trailhead) and just walk the last distance. Sigchos is small and it does not take a lot of time to walk from one side of town to the other.
Likewise, if you need to return to Latacunga from Sigchos, buses will also depart every hour.
Connecting to Quilotoa
Buses to Quilotoa are slightly less frequent. At the time of writing, buses from Latacunga to Quilotoa depart every hour or two. Your hotel will likely be able to give you a more exact schedule.
For those finishing your trek in Quilotoa, you’ll need to walk through the town and wait by the side of the highway. There is no formal bus station and you’ll just have to wait until you see a bus for Latacunga and flag it down.
When I hiked, I was told that the first bus from Quilotoa to Latacunga was at 8:00 am the next morning. I’m naturally paranoid (and an early riser), so I arrived at the bus stop nearly 20 minutes early. That was a good thing because the bus came at 7:47. I talked to another traveler who said that her bus came early too. So, I highly recommend getting to the Quilotoa bus stop early for your bus back to Latacunga.
It’s also worth noting that at the time of writing, the last bus from Quilotoa to Latacunga is at 5:00 pm. If you’re planning on catching the bus to Latacunga immediately after your hike, keep this in mind. If you miss it, you may end up stuck in Quilotoa for one night.

How Long Do You Need for the Quilotoa Loop
The best part about hiking the Quilotoa Loop is that it is completely customizable. You can hike as much or as little as you want. While most people will typically do three days of hiking, you could cut it down to just two days. For that two day hike you have the option to hike from Sigchos to Chugchilan all in one day or to just start your hike in Isinlivi.
That said, three hiking days is the most common.
Where to Stay on the Quilotoa Loop
You don’t have to camp on the Quilotoa Loop and can spend your nights in hostels or hotels. Each town has some offerings, though the amount of offerings varies by town.
Here’s where I stayed.
Latacunga – Hostal Tiana – While you don’t have to spend the night in Latacunga, many choose to spend the night before their hike in Latacunga and Hostal Tiana is by far the most popular hostel for those wanting to hike. The hostel will hold your bags and also provides loads of information for planning your hike. And yes, the hostel does have private rooms.
Sigchos – Starlight Mountain Lodge – Most people skip the night in Sigchos and take the first bus from Latacunga and immediately start hiking, but I absolutely loved this little hotel. The rooms were basic, but the staff was incredible. Plus, by staying in Sigchos, I was able to get some up to date trail info before I left for the day.
Isinlivi – Llullu Llama Mountain Lodge – There’s two options for lodging in Isinlivi and Llullu Llama is definitely the most popular. The staff is friendly and is willing to help you organize any part of your trip. Honestly, this is a place where you could spend one extra day and not run out of things to do because there are so many activities organized by the hostel (though most people just focus on hiking the Quilotoa Loop).
Chugchilan – Lagoon Hotel – A very basic hotel, but it was cheap, had a great location, and had good food. There’s numerous options in Chugchilan but I recommend trying to find a place that is closer to the town center. The further you hike on day two to your accommodation in Chugchilan is less hiking that you have to do on day 3.
Quilotoa – Hosteria Chukirawa – Many people immediately take a bus after finishing the loop, but I was glad I spent the night as it felt like I could process the whole trip. This hotel doesn’t include breakfast, but there are wood stoves in each room that really warm you up.
What I Recommend
I took a bus from Baños to Latacunga and then spent the night. The next day I took a bus from Latacunga to Sigchos. Then the next day, I finally started hiking.
If I were to do it again, I would travel from Baños to Latacunga and store all of my excess things in Latacunga. Then, that same day, I would take a bus to Sigchos so I could start early the next day.
After finishing the hike, I stayed in Quilotoa and I really enjoyed being able to stop and spend the night. It felt like a finality to my hike. I think this really depends on the person and it’s really up to you if you want to stay in Quilotoa after your hike or immediately head on to your next destination.
Food on the Quilota Loop
You’ll need to eat on the Quilotoa Loop, but the good news is that food is pretty easy to come by. In fact, many hostels and hotels will include both breakfast and dinner in the price of your room. My hotels in Sigchos, Isinlivi, and Chugchilan all included dinner and breakfast the next morning.
In Sigchos, my bagged lunch was included and in Isinlivi, there was an option to purchase a bagged lunch for $6.50. Plus, there are places in the towns themselves to buy a few snacks if you need them.
I’d recommend bringing a few small snacks, but don’t stress too much about food on the Quilotoa Loop.
Packing for the Quilotoa Loop
For the Quilotoa Loop, you need to pack light. You need to carry everything you need for the time spent hiking, so try to only bring the essentials.
I brought one extra pair of hiking clothes (in case I got rained on and couldn’t wear it the next day) and a pair of pajamas. That was it for clothes (though I did have enough socks and underwear for every day). Every hotel I stayed at provided shampoo and soap, so you can leave those toiletries behind. These hotels and hostels also provided towels, so there was no need to bring that either.
Get down to the bare essentials and leave everything else behind. Where do you leave it? If you’re starting in Latacunga, leave your things in Latacunga. Hostal Tiana has luggage storage for $1 if you spend the night at their hostel ($2 per night if you don’t stay there).
How Expensive is the Quilotoa Loop?
The Quilotoa Loop is the cheapest multi day trek I did in South America. Mostly, you just have to pay for your transportation, which is very cheap in Ecuador, and your accommodation. I stayed in private rooms, but you’ll find shared dorms in every stop for those wanting to be on an even tighter budget.
I spent $150 for four nights on the Quilotoa Loop. This includes my transportation to and from Latacunga, four private rooms, and all of my food. That’s not too bad.
Final Thoughts
The Quilotoa Loop is a fun, bucket list hike. It’s just challenging enough without being too difficult. While it requires a little bit of planning, it’s totally doable, making it a fun and inexpensive multi day trek in South America.
Continue Your Adventure
Multi-Day Treks in South America: In Peru, you’ll find so many multi-day treks including the 4 Day Inca Trail and the 2 Day Colca Canyon. In Colombia, you can hike the 4 Day Lost City Trek.